Märklin 76XXX Signals
Click here to go to the DB signals site.

The new Märklin series 76XXX signals are powerful additions to any layout. They provide modern prototypical train control on any layout, conventional (analog) or digital. Since I have a digtal layout my helpful hints refer only to that type of layout.
These signals include home signals with and without distant signals, which control blocks, as well as entry and exit home signals for stations with or without distant signal control.
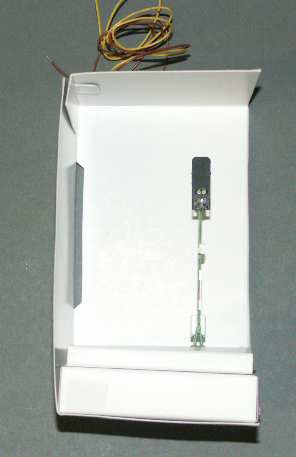
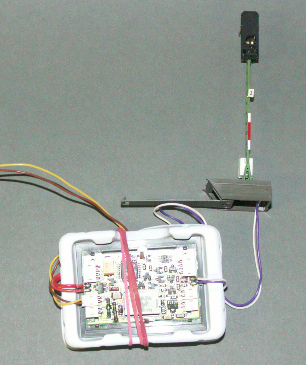
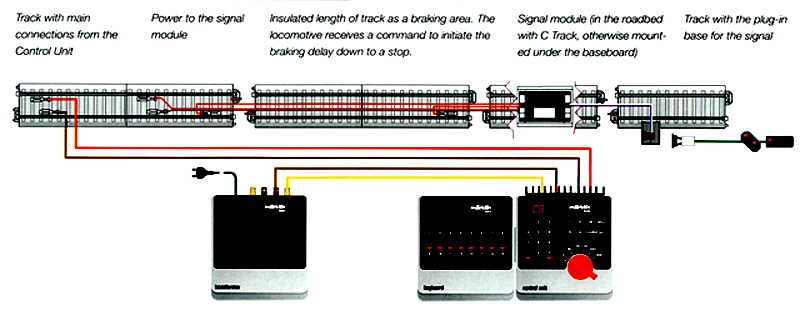
These signals have a built_in decoder in the signal's LED(s) and an electronic unit which fits under C track which reduces the amount of under-layout wiring. The only under-layout wiring I needed was running the yellow and brown wires to a near-by distribution socket wired for my signals and turnouts.
Since the decoder is in the LED's you can remove and change the signal without changing the unit beneath the track. You simply remove the signal mast by disconnecting the PURPLE and WHITE wires from the mast and replacing the signal mast with another one.
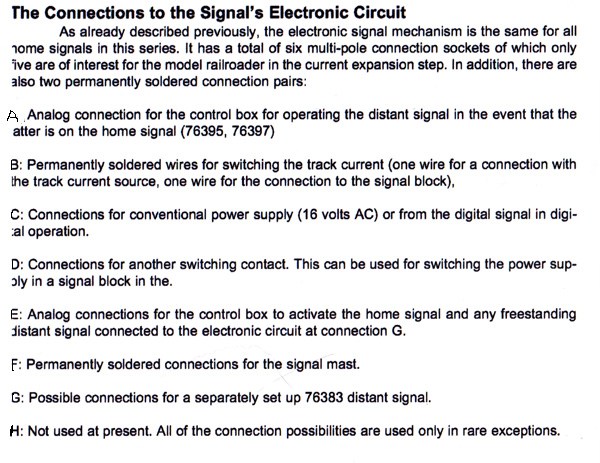
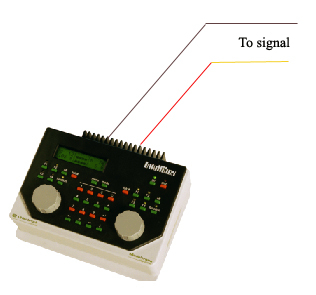
Since each signal must be given a unique address they must be programmed but not with dip switches as happens with C-track turnout decoders. Instead one uses a keyboard attached to a 6021 Central unit or the Intellibox, as I did. While programming each signal is easy there are some helpful hints and cautions one should know.
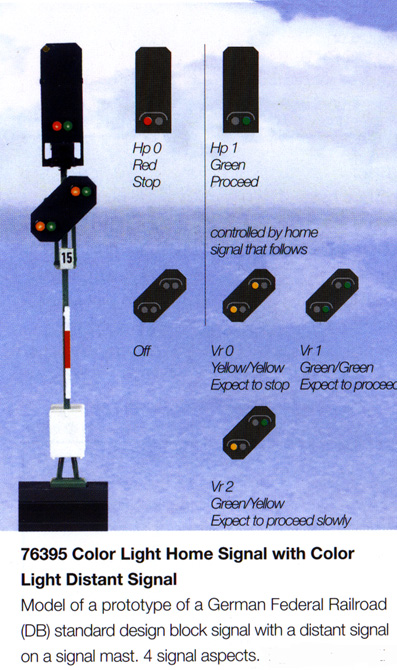
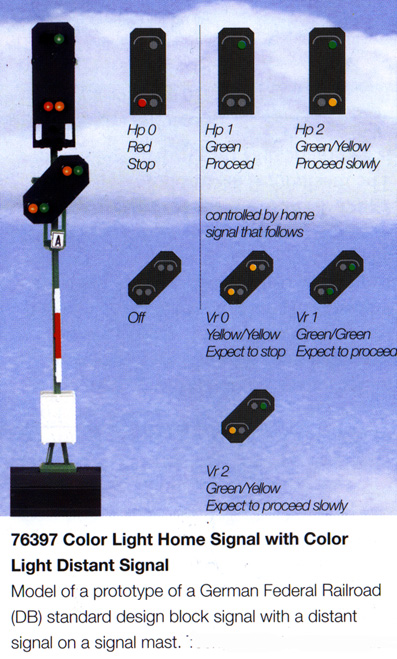
If you follow this steps you should not have any problems programming a signal. First, understand that a home signal with no distant signal capability (76391 with two signal aspects - a red and green light) will need only one pair of (red and green) keyboard buttons. If, as in the case of 76393 with three signal aspects - red, green and yellow lights, there is distant signal capability then you would need two pairs of buttons although the you use only the green button in the second pair. I suggest, as does Märklin, that these button pairs be adjacent to each other. For signal 76394 you need only two button pairs. This signal has two white switching LEDs. As you get to the more complicated entry 76395 signal (six signal aspects) you must use four pairs of buttons with the 2nd and 4th pairs using only the green button. 76397 (seven aspects) signals requires four pairs of buttons with the 2nd pair using only the green button. Keeping the button pairs adjacent to each other will make setting signals easier.
Distant signals are hard-wired to the electronics board using the port designated for that purpose. The distant signal 76383 has a long wire for this purpose. Distant signals are not programmable. They are simply connected to their associated home signal. (See diagram below.)
The 3rd and 4th button pairs for signals 76395 and 76397 control the distant signal LEDs on the mast and are also used for the home signal associated with these distant signal leds. In other words, the distant and home signals are contolled simultaneously. As you set the home signal, the distant signal will change as well.
Diagram of the Electronic Signal Mechanism provided by Tom Catherall

Instructions for programming the signals using a Märklin 6021 and a Märklin keyboard follow:
Programming a signal using a Control Unit (6021) and a keyboard.
1. Connect the keyboard to the Control Unit and a transformer to the Control Unit. Do not connect the transformer to the mains.
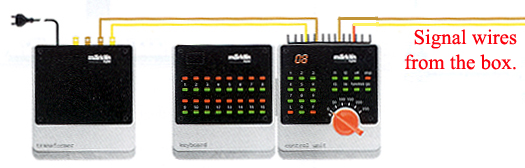
2. Open the carton but DO NOT REMOVE THE SIGNAL FROM THE CARTON AND UNDER NO CIRCUMSTANCES REMOVE THE SIGNAL FROM THE WHITE PLASTIC TRAY THAT HOLDS THE SIGNAL AND DECODER - YOU MUST HAVE THE DECODER CONNECTED TO THIS TRAY TO PROGRAM IT. Extend from the carton only the YELLOW and BROWN wires and connect the YELLOW wire to the clip on the Control Unit (NOT THE YELLOW CLIP) and the BROWN wire to the BROWN clip on the Control Unit.
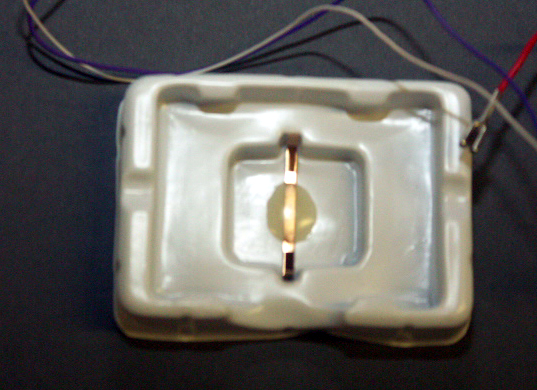
This tray must not be removed from the signal until after you have completed the address programming. Save the tray with the brass bar for future change of address programming.
3. Decide what address(es) you will assign to the signal being programmed. Set the four dip switches on the keyboard for the address(es) you will be setting. If the switch is set only for address one, then set the dip switches 1-4 to the "OFF" positions. I chose to set the signal for address 161 so I set dip switches 1 and 4 to the "ON" position.
4. Connect the transformer to the power mains. Press the STOP button then quickly press the GO button. Waiting more than thirty (30) seconds between steps aborts the programming process. The red and green lights (two aspects) will flash.
5. Press the GREEN button of the first button pair you want the home signal address to be. All of the aspects will light up. Wait a few seconds for this to happen.
6. For the 76391, turn off the control unit. The signal 76391 is programmed. Disconnect the signal from the white plastic base. NOTE: YOU CAN NOT TEST THE SIGNAL ADDRESS WITH THE WHITE BASE CONNECTED. IF YOU DO, THE SIGNAL REVERTS TO THE DEMO MODE AS LONG AS THE WHITE BASE IS CONNECTED.
7. For signals 76393, 76394,76395, 76397 press the GREEN button of the second button pair. The aspects will light up. Wait a few seconds for this to happen.
8. For signal 76395 and 76397 press the GREEN button of the third button pair you This will be the address that will also be used for the home signal that the distant signal on the mast of 76395 or 76397 is associated with. The aspects will light up. Wait a few seconds for this to happen. Note that the addresses you select for the 3rd and 4th button pairs must be the address you will set for the 1st and 2nd button pair for the home signal associated with this distant signal.
9. For signal 76395 and 76397 press the GREEN button of the fourth button pair you This will be the address that will also be used for the home signal that the distant signal on the mast of 76395 or 76397 is associated with. The aspects will light up. Wait a few seconds for this to happen.
10. All of the signal aspects will turn off, then on, then off. In some cases, all of the signal aspects turn on and stay on. Your signal is programmed even if the all aspects do not turn off as indicated in the instructions.
11. Turn off the control unit. Disconnect the signal from the white plastic base. NOTE: YOU CAN NOT TEST THE SIGNAL ADDRESS WITH THE WHITE BASE CONNECTED. IF YOU DO, THE SIGNAL REVERTS TO THE DEMO MODE AS LONG AS THE WHITE BASE IS CONNECTED.
Programming Märklin Signals with the Intellibox (IB).
These instructions were prepared with the help of Marout Yasuo Sluijter-Borms.
1) Turn on IB.
2) Set IB keys so that first pair corresponds to the adresses you want for the signal. Do not have a loco signal being sent to the track.
3) Make sure the desired adresses are set as Motorola, not DCC.
4) Make sure the brass clip, or a substitiute connects the contact surfaces on either side of the signal PCB.
5) Set IB to STOP.
6) Hook signal to IB.
7) Set IB to GO and after 1-2 secs to STOP.
8) Set IB to GO [Signal should blink between 2 states].
9) Press GREEN key of first signal adress [Signal should light all leds].
10) Release GREEN key
--Next steps are only for 2-address signals 76393, 76394, otherwise go to step 17.
[Signal shoud be blinking between 2 (different) states now].
11) Press GREEN key of second signal address [Signal should light all leds].
12) Release GREEN key. [Lights go off, and on again.]
--Next steps are only for 4-address signals 76395, 76397, otherwise go to step 17. Note that the addresses you select for the 3rd and 4th button pairs must be the address you will set for the 1st and 2nd button pair for the home signal associated with this distant signal.
[Signal shoud be blinking between 2 (different) states now].
13) Press GREEN key of third signal address [Signal should light all leds].
14) Release GREEN key. [Lights go off, and on again.]
15) Press GREEN key of fourth signal address [Signal should light all leds].
16) Release GREEN key. [Lights go off, and on again.]
17 Disconnect power from signal.
18 Remove white tray or clamp between side contacts on PCB.
19 Connect signal and test it.
The white tray should be saved. It can be used again to re-program the signal. Marout Yasuo Sluijter-Borms uses a modified wire with 2 crocodile clamps. The crocodile beaks grasp the special contact surfaces on the signal PCB sides from below the plastic PCB-backplane.Wiring for Marklin Signals.
Below is a diagram of the wiring for a 76391 signal using track voltage for the signal.
Below is a diagram of the wiring for a 76391 siganl using power from a transformer or from a power buss under the layout.

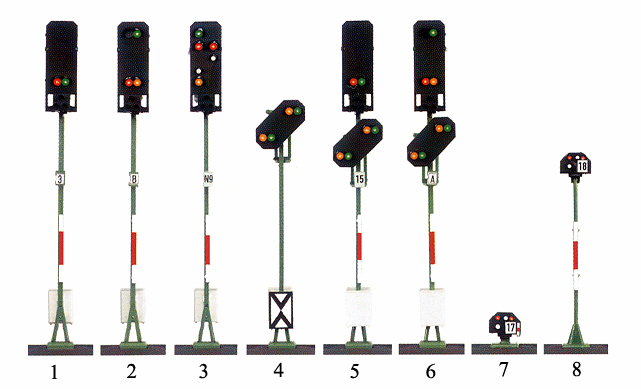
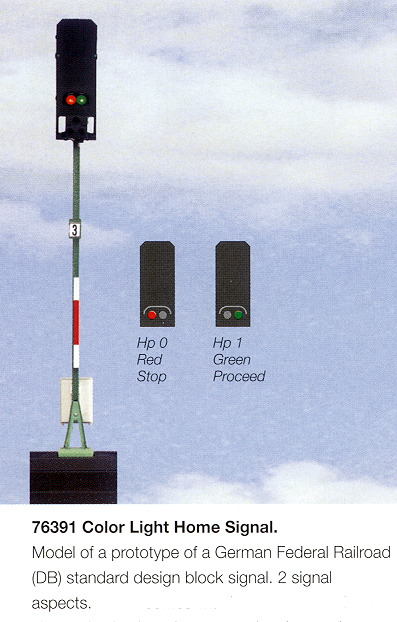
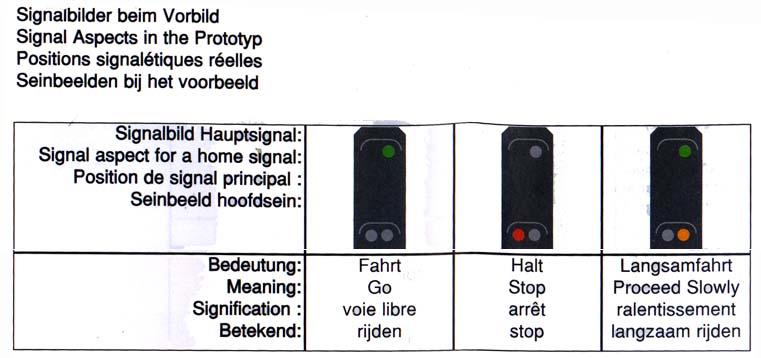
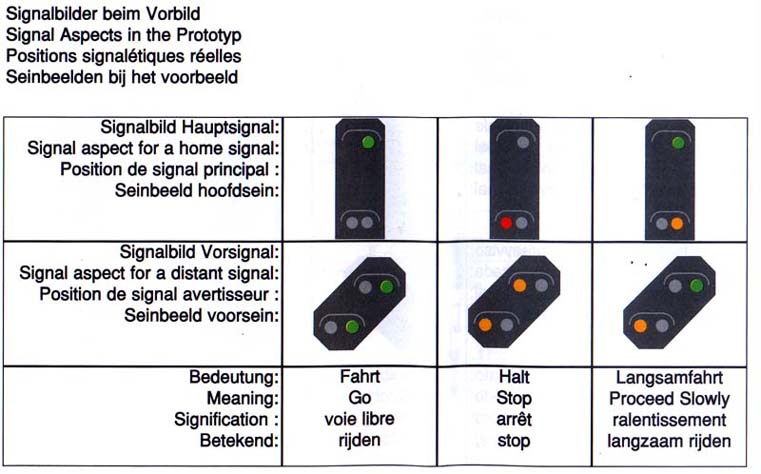
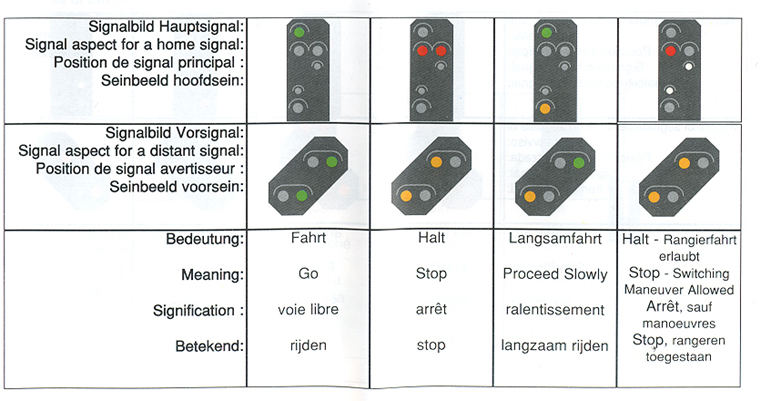
1. 76391 Block signal - for safeguarding a block on a mainline.
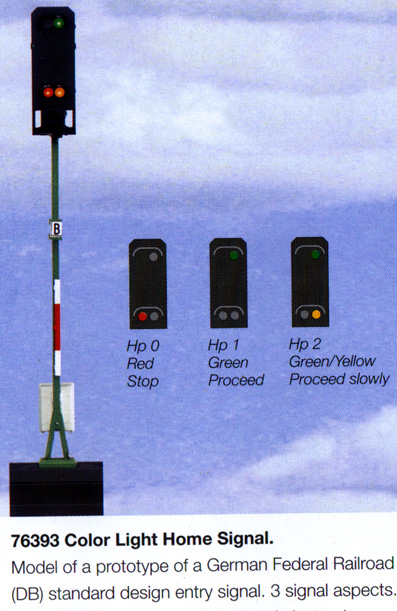
2. 76393 Entry signal - for controlling entry to a station.
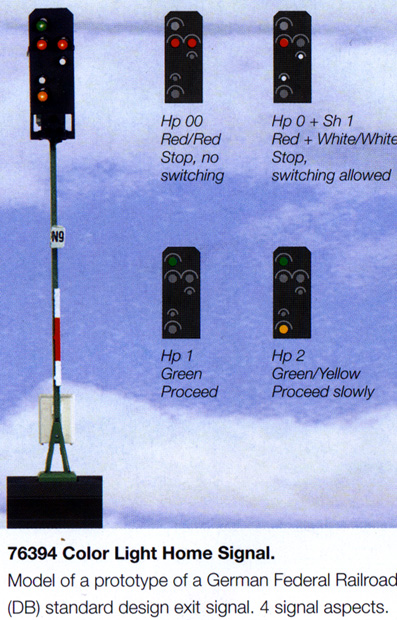
3. 76394 Exit signal - controls exit from a station with a protection signal for authorizing switching maneuvers.
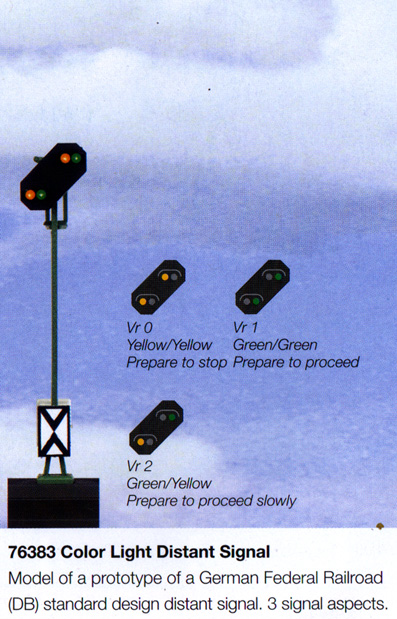
4. 76383 Distant signal for home signals - located in front of a block, entry, or exit signal warning of the status of a home signal ahead.
5. 76395 Block/distant signal - for safeguarding a block on a mainline with a distant signal for a block or for entry.
6. 76397 Entry signal/Distant signal - for control of entry into a station with a distant signal for an exit signal that follows.
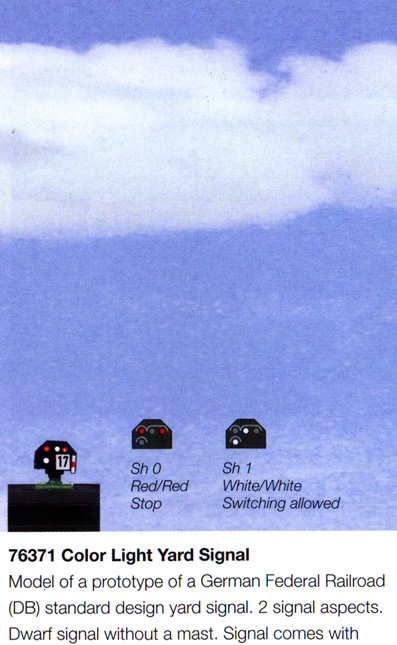
7. 76371 Yard signal without a mast - used in switching areas.
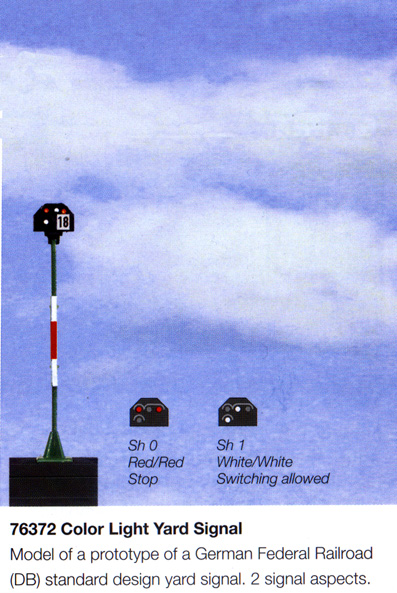
8. 76372 Yard signal with a mast - used for switching areas.

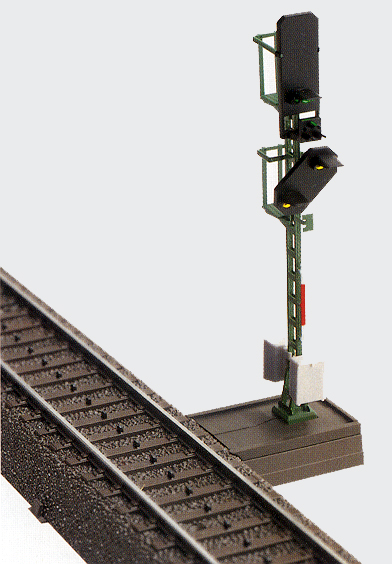
The signal on the track.
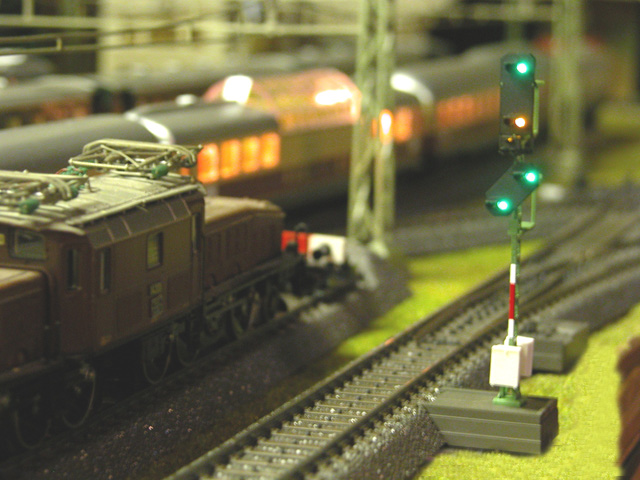
The 76397 entry signal on the mainline.

I label each signal PCB after it is snapped onto the C track. There are four pins on the underside of C track for snapping the PCB in place.
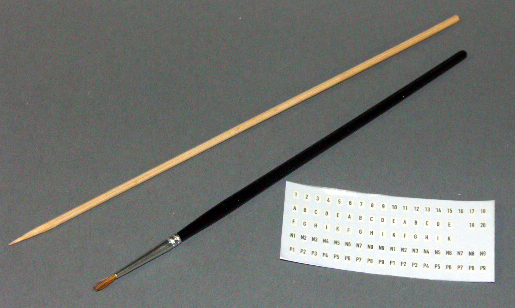
I used a brush to wet the signal number decal and a pointed stick to help afix and center the decal on the signal number plate.